Get Window Dimensions in React Native
React Native includes a hook for getting the current device's window dimensions in pixels.
const {height, width} = useWindowDimensions();
React Native includes a hook for getting the current device's window dimensions in pixels.
const {height, width} = useWindowDimensions();If you want to switch which android device you are emulating on Android Studio,
More Actions Virtual Device Manager + icon to add a new device, and select the android model you'd like to emulate If you're developing an Android app and you want to use a real device instead of the emulator then you can use scrcpy:
scrcpy --stay-awakeIt's faster than the emulator and you can interact with your computer's mouse & keyboard with the Android device.
We had a situation that we wanted to guarantee that an "index" page under a tab navigation was always there, this way we could go back using the navigation to the index page, even if the user entered to that tab navigation via another screen. I learned that we can use withAnchor prop in conjunction with the unstable settings initialRouteName. This worked really fine and now our back buttons always go to each tab's index screens.
Check this out Expo Router navigation patterns
The delayLongPress prop on the react native pressable component allows you to specify a delay in milliseconds before the onLongPress callback prop is executed. Allowing you to control exactly how long a user should press on the element before receiving feedback etc.
You can set the dimensions of the simulator window to be the exact physical size of the simulated device on the xcode IOS simulator.
Window -> Physical Size or Command + 1
When using the iPhone simulator, under the Window menu bar tab, there is an option for Stay On Top that will keep the simulator on top of any other windows.
This is very helpful, for example, for keeping the simulator up as you make changes in your text editor.

We found it very annoying to navigate to settings>accessibility>display>larger text just to verify that things still look good on phones with larger font sizes.
Turns out you can adjust the font size of the simulator much quicker using the following keyboard shortcuts:
CMD+Option++ to increase the font size of the device
CMD+Option+- to decrease the font size of the device
NOTE!
Just keep in mind, even if you have Larger Accessibility Sizes toggled off, you can still get to the larger font sizes this way.

In React Native you can use the onLayout prop along with the nativeEvent's layout to get the dimensions (in pixels) of a rendered component.
const [viewDimensions, setViewDimensions] = useState({height: 0, width: 0})
return (
  <View
     onLayout={(e) => setViewDimensions(e.nativeEvent.layout)}
  />
)
Now we have an object containging our view's height and width saved as viewDimensions
In React Native, the RefreshControl component can be placed inside of a scrollview component to handle refreshes. When the user scrolls up, the onRefresh function will be called where you can handle your refresh/query logic.
You can keep your xcode IOS simulator window on top of all your other windows by selecting Window -> Stay on top

If you want to see the device keyboard while using the Xcode simulator, use ⌘ + K
As a follow up to my previous TIL about building expo, I just learned that you can run your build locally! Just use the --local flag.
It's important to note, you will need Ruby installed locally, as well as the fastlane and cocoapods gems
gem install fastlane cocoapods # only if you haven't already

eas build --platform ios --profile dev --local
After seeing some very unexpected behavior, I went down the rabbit hole of StackOverflow, Reddit, and finally the Expo documentation for the function watchPositionAsync.
As it turns out, I had overlooked that this function returns a promise that resolves to a LocationSubscription. Meaning the following code does NOT work for obvious reasons.
Bad ❌
import { Accuracy, watchPositionAsync } from 'expo-location';

function Actions() {
   useEffect(() => {
      const subscription = watchPositionAsync(
        { accuracy: Accuracy.Balanced },
        coords => console.log(coords)
      );
      return subscription.remove();
    }, []);
  // ...
}
In order to get the subscription object, I had to let the promise resolve. This now looks like below.
Good ✅
import { Accuracy, watchPositionAsync } from 'expo-location';

function Actions() {
   useEffect(() => {
      let subscription;
      async function watchLocation() {
        subscription = await watchPositionAsync(
          { accuracy: Accuracy.Balanced },
          coords => console.log(coords)
        );
      }
      watchLocation();
      return subscription?.remove();
    }, [])
  // ...
}
Hooray documentation! 😅
https://docs.expo.dev/versions/latest/sdk/location/#locationsubscription
Before today, I was familiar with the older Dimension API. However, you can use the hook useWindowDimensions to get screen size updates in a React Native component. The values returned by the hook will change as the screen size changes.
import { useWindowDimensions, Text, View } from "react-native"

function App() {
  const { width, height } = useWindowDimensions();

  return (
    <View>
      <Text>{width}</Text>
      <Text>{height}</Text>
    </View>
  )
}If you're using EAS to build your Expo app, you can build then install it with the following command:
eas build --platform iosOf course, the caveat here is that you must wait for the build to finish.
But, if you already have a build in EAS and you just want to install it on your local simulator, you can use:
eas build:run --platform iosApparently there's no way to have a local Android emulator for Samsung devices but TIL that Samsung has a FREE device farm service where you can spin up a real device and do manual tests, all through the web browser: drag & drop our APK and be ready to test it.
Check it out https://developer.samsung.com/remote-test-lab
Get MacOS's Network Link Conditioner.prefPane.
Hardware and double-click Network Link Conditioner.prefPane to install. Use it:
Settings then Network Link Conditioner Profile and toggle the switch ON I was getting the following error on the CI when it was trying to archive the project and I couldn't figured out what was going on:
xcodebuild failed with return code: 65So I decided to archive the iOS project locally and the error was different:
:-1: Multiple commands produce
1) Target 'React' has a command with output '~/Library/Developer/Xcode/DerivedData/.../IntermediateBuildFilesPath/UninstalledProducts/iphoneos/libReact.a'
2) Target 'React' has a command with output '~/Library/Developer/Xcode/DerivedData/.../IntermediateBuildFilesPath/UninstalledProducts/iphoneos/libReact.a'

:-1: Multiple commands produce
1) Target 'yoga' has a command with output '~/Library/Developer/Xcode/DerivedData/.../IntermediateBuildFilesPath/UninstalledProducts/iphoneos/libyoga.a'
2) Target 'yoga' has a command with output '~/Library/Developer/Xcode/DerivedData/.../IntermediateBuildFilesPath/UninstalledProducts/iphoneos/libyoga.a'
Then I googled it and found this: https://github.com/facebook/react-native/issues/21583#issuecomment-428043049
Then I added this post_install block at the end of the Podfile:
post_install do |installer|
  installer.pods_project.targets.each do |target|
    if target.name == "React"
      target.remove_from_project
    end

    if target.name == "yoga"
      target.remove_from_project
    end
  end
end
It worked locally and on the CI.
Finally I gave a 👍 on that comment.
Bumping Info.plist versions by hand can be very error prone (e.g. remembering to bump multiple targets in a project)
Fortunately Xcode's cli has an easy solution
xcrun agvtool new-marketing-version <versString>
So if my Application targets are at version 2.0.4 and I need them to be at 2.0.5 I simply run this command at the terminal:
xcrun agvtool new-marketing-version 2.0.5*References: https://developer.apple.com/library/content/qa/qa1827/_index.html

If this happens when developing a React Native app with Expo and trying to test it in the iOS Simulator, it means the version of Expo on the iOS Simulator is out of date.
To fix that try the following:
This will cause the Expo app on the simulator to reinstall with the latest version.
There is a workaround to log all React Native HTTP Api calls on the Chrome dev tools. Add the following code to the index files:
if (__DEV__) {
  GLOBAL.XMLHttpRequest = GLOBAL.originalXMLHttpRequest || GLOBAL.XMLHttpRequest;
}
Make sure it only works for the dev enviroment checking the __DEV__ variable.
Credits: https://github.com/facebook/react-native/issues/934
In the Xcode preferences, there's a section for Behaviors where you can specify how Xcode should handle certain situations. What I learned about today was that you can have Xcode tell you when your tests pass or fail:
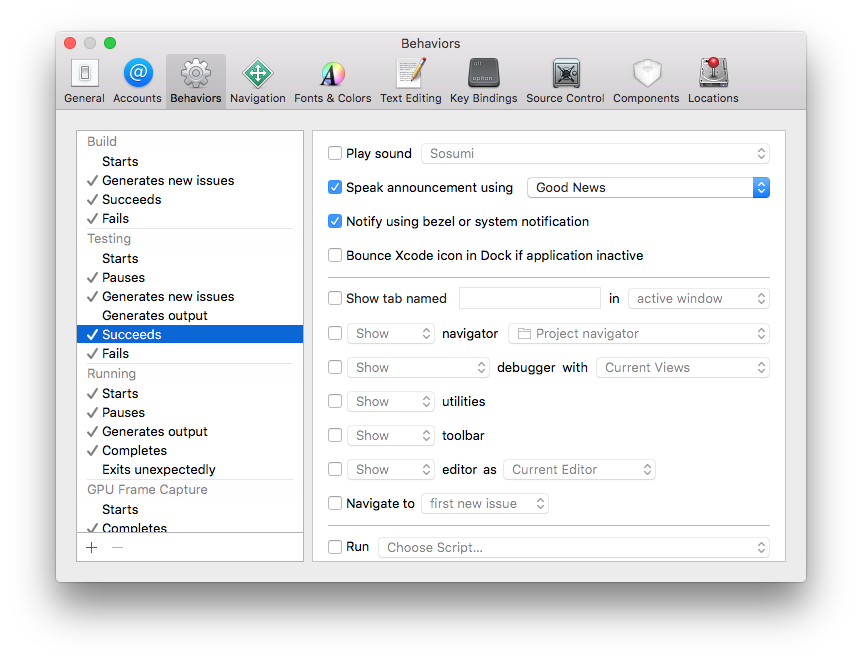
Here I have told Xcode to use the Good News voice to announce when my tests pass. I also picked a voice for passing tests: Bad News seemed appropriate.
Comes in handy when you have switched to another application and you happened to miss the notification in the corner of the screen. Plus, it sounds cool.
h/t Leo Picado
I recently switched over a Phoenix app from the paid Heroku SSL add on to the new SSL beta. Everything seemed to work great, until I noticed all Network Requests from the Android side of my React Native mobile app were failing, however iOS, curl, postman, etc were all fine.
I banged my head around for a while and went back to check my SSL set up. During the beta setup, Heroku tells you your certificate is usually a .pem or a .cert. I have both. Without much though, I uploaded the .cert. I went back and uploaded the .pem, and everything works fine.
I don't know why the .pem worked and the .cert didn't, but I'll do some digging and post a follow up to this when I know why.
Swift allows developers to specify variable names in unicode, which is very helpful if you and the rest of the developers to ever touch your code speak a non-english language which uses unicode characters:
let 你好 = "你好世界"It is also useful if you want to specify special constants such as
let π = 3.14159most importantly though, it allows developers to use emojis for variable names:
let 🐶🐮 = "dogcow"
let #🚀 = "Hashrocket"
NSLog(#🚀)
but don't take my word for it, read the official documentation which contains some of the above examples.
Note: the pound sign above (#) is unicode, that is why it is allowed as part of a variable name, whereas normal # sign is not.
P.S. to access emojis and other unicode symbols directly in the current edit field press ^⌘+\<space> on Mac.
Xcode scans your code for compiler errors as you type. These errors show up as a red dot in the gutter that can be clicked to reveal the error message. Xcode may also provide a Fix-It that you can accept.
When your file contains multiple errors and you want to accept all the Fix-Its, do this: Editor > Fix All in Scope. Better yet, the keyboard shortcut: ctrl + opt + cmd + f.
This feature can be a little unpredictable because while Xcode does a great job of identifying compiler errors, it's not always great at suggesting fixes. But, when you're confident that you know what the fix is going to be, it can be very handy to let Xcode help you out.
One place I find myself using this feature is when I change my mind about a constant:
let foo = 1
// some code
foo += 1
I thought foo was going to be a constant, but then further down the file I realize my mistake - Xcode will error and I'm usually sure that hitting ctrl + opt + cmd + f will switch the let to var for me.
If you have an expensive scene to render with a lot going on in the constructor, or componentDidMount, etc, your navigator animation will likely by choppy because the Javascript thread is blocked executing that code. Use the InteractionManager API to execute that code after the transition ( and render a placeholder if necessary).
https://facebook.github.io/react-native/docs/performance.html#slow-navigator-transitions
import React, { Platform } from 'react-native';

if(Platform.OS === 'android'){
//...
}Swift supports public get but private set on properties:
// foo.swift
public class Foo {
  public private(set) var bar: String = "hahaha"
}

// baz.swift
let foo = Foo()
foo.bar = "muhahaha" // "Cannot assign to property: 'bar' setter is inaccessible"
So, Foo is a public class with a public String property called bar. This property can be read, but cannot be set from the outside.
Xcode's Test Navigator (cmd + 5), is an outline of your tests. As you mouse over the elements in this outline, you'll see a run button off to the right. Using this button you can pick an individual case, file or target to run.
While editing a test file, you can use the buttons in the gutter to run either an individual case or the entire file.
But if you want more control, you can shift or command click on test cases in the Test Navigator to highlight them and then command click to bring up even more options:
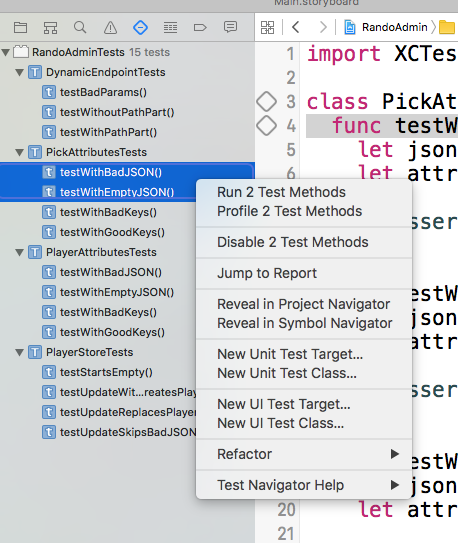
We can choose to run both highlighted cases or even disable them. Nice.
But, what about keyboard shortcuts??
You can run the entire suite with cmd + u, but did you know about these others:
ctrl + opt + cmd + u - Run the test file currently open. ctrl + opt + cmd + g - Rerun the test(s) you just ran. That last shortcut can be really helpful. Once you've run a particular test case in isolation, you can use that shortcut to run it over and over as you work.
Like many languages, the arguments to functions in Swift can have default values. As the documentation notes, it's a best practice to place these arguments at the end of a function's parameter list:
func foo(bar: String, baz: String = "omg", bah: String = "haha") {}
foo("<3 <3 <3") // `baz` and `bah` take on the values of "omg" and "haha" respectively
What I learned today is that when calling a function like this, the default arguments can be in any order:
foo("<3 <3 <3", bah: "first!", baz: ":(")Weird!
Joe Groff has a proposal on the mailing list to change this behavior.
Credit where credit's due: I found out about this while reading the excellent Swift Weekly Brief.
If you upgrade your React Native app to 0.22 and you start getting the following error <Text> can't have any children except <Text>, <Image> or raw strings even if your <Text> components are all correct, just disable the new Hot Reloading feature that was introduced in this version and the errors will stop:
Shake the device => Disable Hot ReloadingSo far, there is no official implementation for linear gradients in React Native but there is a really cool open source component that implements that for both platforms: Android and iOS.
Check it out react-native-linear-gradient
<LinearGradient
  colors={['#F00', 'transparent']}
/>
In iOS when you want to clip part of the subviews that are out of the bounds you just set clipsToBounds = YES; in the parent view.
In Android you set setClipChildren(true); in the ViewGroup.
React Native tries to mimic CSS with their own implementation of it, so you can set the property overflow: 'hidden' in the view's style.
Easy as pie!
android:maxLength="4" such a simple solution to a simple problem
Today i learned how to make a static singleton class in swift
class SharedManager{
static let sharedInstance = ShareManager()
///properties and methods below
}Today I had to integrate a project that I am working on for open source distribution with Cocoapods. I have used this repository manager before but not in swift.
You have to uncomment or type in !use_frameworks in you Podfile
You then type in the appropriate space which pods you want to install
Then do pod install
Create a header file for bridging the objective c code
Then in your build settings , swift code generation area type in the name of the header file you just created
# Uncomment this line to define a global platform for your project
platform :ios, '9.0'
# Uncomment this line if you're using Swift
use_frameworks!

target 'TippleiOS' do
    pod 'Stripe', '~> 4.0'
    pod 'AFNetworking', '~> 2.5.4'
end

target 'TippleiOSTests' do

end

target 'TippleiOSUITests' do

end